How to shoot product photography with single strobe lighting – Digital Camera World


(Image credit: Future)
Professional product photography is a deceptively complex genre. In order to create the image styles sought after by clients today while fulfilling the main functions of any product shot – to draw attention to and sell the featured product – lighting must be tightly controlled.
In many cases product photography professionals utilize a multi-light setup, but where space is limited, or when working on a limited budget, a single strobe can suffice. In some cases a single light can be desirable to create a strong directional look, where using a second strobe would introduce too much light to the scene and add unnecessary complication to the photographer’s workflow.
Read more Photography tips

Before: A combination of a misplaced strobe and excessive power have produced blown highlights, dark shadows and a distracting background, with lack of attention on the subject
(Image credit: Future)
After: By repositioning the strobe, less light falls on the background, shifting focus to the subject, while better control over light balance emphasizes the glossy contours
(Image credit: Future)
However, the main challenge with this approach is that one side of the product can appear underexposed, especially with dark, glossy materials. Where this occurs it is important to add a fill light by reflecting some strobe light back onto the surfaces not facing the light source. This provides a more subtle second light effect than even the lowest power setting on a second strobe could achieve.
With a creative approach to lighting angles and a good knowledge of how exposure relates to lighting output, a magazine style can be attained with minimal investment in time and potentially costly studio equipment.
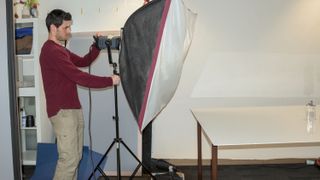
Step 1: Place the light
(Image credit: Future)
Attach a large softbox to your strobe. While we want a fairly tight light spread, background illumination can be altered later, while product highlights will be kept soft by the large light source.
Step 2: Arrange the products

(Image credit: Future)
Set out the items to introduce a sense of depth. Stagger the objects to avoid too much linearity, which does not produce an interesting perspective. Ensure good background separation.
Step 3: Choose a focal length
(Image credit: Future)
Depending on the size of your studio, a longer focal length will compress the scene, making items appear closer together, minimising optical distortion and cutting negative space within the frame.
Step 4: Set the aperture

(Image credit: Future)
To keep all of your subjects sharp, stop down to at least f11. You may need to use a higher f-number to manage image brightness, so moving the items away from the background reduces unwanted detail.
Step 5: Adjust strobe power

(Image credit: Future)
If your shot is too bright, with blown highlights on one side of the product, keep your camera settings the same and reduce strobe output. Don’t move the light back – this can create too much directionality.
Step 6: Use a reflector

(Image credit: Future)
Use a piece of white card or perspex to bounce back light onto the dark side of the items. This will create a similar look to a second softbox, but with a more manageable output. Vary position and angle.
Step 7: Adjust settings

(Image credit: Future)
If your scene is still too bright, increase the shutter speed to around 1/200 sec. This will cut ambient light without exceeding the maximum sync speed with the strobe. Fluorescent WB adds a cool tone.
Step 8: Adjust light position

(Image credit: Future)
If your background is too bright, angle the light at 45° towards the camera, slightly behind the products, to reduce spread and feather the subjects’ illumination. Be aware of flare and reduced contrast.
Comments
Post a Comment